Search

Tuesday, October 30, 2012

A New Craft Space {A New Start}

I have changed my craft space around so many times only to find yet another inspirational photo making me want to change it again. I guess I can blame Pinterest. Although I love it! There are so many photos  of beautiful inspirational rooms online it makes me crazy! I know my room does not have to look like it came from a magazine but I NEED it to inspire and motivate me....especially now that motivation is hard to find. I have been battling this for a while now. I can't seem to find a balance. Being a Stay At Home Mom is hard enough. I have recently changed my title to Work At Home Mom. It has always been my dream to work at home and to be there to care for my children. I want so badly to make my business successful and to also be a successful House Wife and Mother. Just finding time to do laundry and vacuum can be difficult. It seems like if my house is clean and organized, I am behind in my work and my craft room is wrecked. If I am caught up on my work, I am behind on laundry and dirty dishes occupy my sink. How do I balance it all? I keep reminding myself that I am lucky to have a husband who supports me in what I want to do. I keep telling myself that next year will be easier because my two 5 year olds will be in Kindergarten. What 7 hours of uninterrupted work time could do for me! Not that I am trying to push them out, I love the fact that they are home with me. I love taking them to their library activities and getting to spend time with them while I work. I can't help but to think about what it would be like to not have to stop every 10 minutes to answer to them though. So, I have a plan. This is a BIG one! In order for this plan to work, I need order in our home. So this is what I came up with:

1. We need a family command center. This will include a chore chart, calendar for extra curricular activities for my kids, a place for my daughter to put her school papers, a place to hang important papers and write reminder notes. This will be in our entry way where all can see. 

2. A room that inspires us to create. This goes for my children and myself. It would be easier to keep their little hands busy if they had a nice space of their own as well. We have already started on this one. They have a table and shelf in the craft room. We have this very cool closet nook space in our craft room that my girls have always wanted for a reading space. My husband has just installed a light in there for them. It's a work in progress!

3. A different space for each type of craft for me. I was trying to do everything at my sewing table. The problem with that is that the table gets full of stuff very quickly and I spend more time picking up than working on new product. I want to have an office/space to scrapbook (this is just a hobby for me), a table to sew, a cutting table, an ironing table and a place to create hair accessories.

4. A COMMAND CENTER for my business. This is on the top of my list! This is very important to me as I hope to stay organized with my business this way. I will have a place for orders, model bookings, giveaway ideas, design ideas, inspiration, new product ideas and much more! I have a wall on reserve for just this. I've had an inspiration picture for a long time. I plan to do this over the weekend! Here is my inspiration photo.
Mine will probably be more full. The basic idea is here though. The cork board, the peg board, The white board, the chalk board.  I also love the pockets. If I laminate 12X12 scrapbook paper, it turns it right into a dry erase board. How cute and organizational is this! I absolutely LOVE IT!!! As I make progress I will be posting more pictures. I am in a hurry {so I can get back to work} to pictures will come in tomorrows post.


What do you want to do to your craft space? If you have a craft space please leave me a comment with your blog link so I can visit <3

Here are some rooms that inspire me:
{I want to take something from each room and place it in mine. Whether it's a storage idea or decorative}
This would be great to store scrapbooking supplies OR hair accessory supplies. I could also see some sewing supplies stored on these.

 Do you have extra drawers you do not need anymore? How cute is useful is this? I have some in the garage I am thinking about using.
 If only I have a larger room! My kids would LOVE this!
 This set up is a lot like mine. I love the island table made with shelves. Color and all!
I envy that HUGE table and storage space under it.

Thursday, July 26, 2012

New Hair Bow Holders

My girls have an abundance of hairbows due to the fact that I cannot stop making them for them:) I am obsessed with hair accessories and making them! So, I wanted cute hairbow holders that will hold a lot of bows AND headbands. I Google Imaged them (something else I am obsessed with doing) and found some really cute ones! I really LOVE the ballerina bow holders! They are insanely cute! Like this one I found  here. http://www.ciaobellabows.blogspot.com/ 
This would be adorable to have in a cute bedroom but I wanted my kids to be able to make it.

I made this one for a customer in my shop www.etsy.com/shop/tpmp

I do love to hand paint things and give it that personalization. I was really tempted to do this for my girls with thier favorite colors and thier name on it....still, it would be cute on the wall but wouldn't be fun for them to help with.

Here is something else I considered. This is one of my favorites! She gives great instruction on how to make one! Here they are. http://blog.angelayosten.com/2010/06/hair-bow-holder-tutorial.html


After giving it a lot of thought I decided that my girls would have more fun creating something they could be proud of. So, we went through some canvas and settled on the simple canvas bow holders. They had a blast! I think this was one of the best projects we have ever done together!

My girls loved choosing thier paint color and painting thier own canvas. Don't mind the mess on the porch. We always have multiple projects going on. lol
I think they made good choices for thier canvas color:)
Next they got to choose thier ribbon from my scrap ribbon. That was fun!

Here is a small tutorial for how to make these cute simple bow holders.
1. Paint your canvas (or let your little one do it.)
2. Choose your ribbon. I like to use different width ribbon. The bigger bows stay on the 7/8" and 1 1/2" ribbon better than they would the smaller width. I like to put the clippies and small bows on the 5/8" and the 3/8" ribbon. Also, when you are laying out your ribbon and deciding where to glue it, keep in mind the type of bows your child usually wears. If you don't space the ribbon far enough apart you will not be able to use all of the ribbon and you will lose some space on your bow holder. Here is an example of that:

Notice that lavendar 3/8" ribbon in there? I'm sure when we move some bows around we can eventually use it.

3. Cut your ribbon pieces long enough to where you can tuck them in to the wood frame just a little on the back of the canvas. This make it tighter, it lays flat against the wall because the glue is on the inside of the canvas frame and not right on the back.


4. Glue all of your ribbons spaced out.


My little girl chose all of these herself. I should have put the 3/8" ribbon closer to the edge of the canvas.
This holder does not just hold bows. We needed something to hold the headbands as well. So, this is what we did. Cut a longer piece of ribbon to loop to hold the headbands. Here is an example of what it will look like.

I left the space (like you see on the pink plaid) so I could put clippies there too. That ugly space will be covered with clippies.

Here's how to make the loops. Glue the end of the ribbon right between the frame and the canvas as shown below.


Then glue down the frame and press the ribbon down as flat as possible so the frame will sit against the wall flat.


Your ribbon will hang down as shown in the photo below.


Now loop your ribbon up and glue it and you're finished  :)
Very simple, cute, colorful and your little one will have fun making it and be very proud of her creation when she is finished. Tip: Obviously you wouldn't want your little one to use a hot glue gun. Pick up a cool temp glue gun for these type of projects. I will be doing that this weekend. Happy Crafting!


Here is our finished result. They have a lot more bows than this. They will be on there today.


I am planning on picking up some wooden letters for thier initial to go above thier bow holder. I will paint those to match thier room:)


I LOVE LOVE that we can store thier head bands! I made my loop kind of big so they will hold more than one head band.
Wednesday, July 25, 2012

A new wardrobe for my little {big} girl

My little {big} girl is going to public school this year :( It's bittersweet. I'm excited for her but I will miss homeschooling her. After 3 years of her not having a real birthday party with actual friends there because we don't really know anyone here she came to me asking to go to public school. If we lived in a big city that answer probably would have been a firm NO but we live in a small town and the schools here are not bad. Now, for those of you that think homeschooling makes a child socially awkward. We do not NOT know anyone here because we homeschooled. We moved 6 hours away from everything we knew so my husband could be closer to his parents and get a better job. My child is not in the least bit socially awkward. She is quite opposite actually. I am always having to tell all 3 of my girls to stop telling people we don't know our whole life story. lol


I am happy that I get to make her an adorable wardrobe! I have a million little outfits in my mind! From Peasants to apron knots to twirl dresses....It's all there! She has informed me that she wants a new outfit for the first 2 weeks of school! She is her mothers daughter and a little clothes horse! I suppose that is my fault. None of my 3 girls will wear anything from a clothing store. They all want one of a kind outfits that no one else has. My husband says that I am heading into trouble because they will eventually become teenagers. Some say they will grow out of it and want clothes from the Mall when they are older. If they are anything like my Mother they will have me working at all hours of the day to create them that one of a kind outfit. My Grandmother was an amazing Tailor! Not just a seamstress, she could make anything fit like a glove on anyone.


I have been searching high and low for the right kind of inpiration for this wardrobe. I love many pattern makers. Mama Stellato, Little Lizard King, Tye Die Diva. One that really has me in awe is Create Kids Couture. Mostly because of their choices in fabric combinations! I have one pattern by them. I will eventually have many more. What are some of your favorites? Free patterns are my favorite of course! Who doesn't love something that's Free right? Speaking of Free. I was trying to think of what to do with all of the scrap fabric I had. My daughter asked for a "patchy dress". So, I made a bodice, we sewed all of the square (after cutting them of course) together and this is what we got! Isn't it cute?


What ideas do you have? I would love to hear {read} about them! If you have a crafty blog, ready a crafty blog or know of any great patterns please post them:)

Thursday, December 22, 2011

An Adorable Owl Pillow

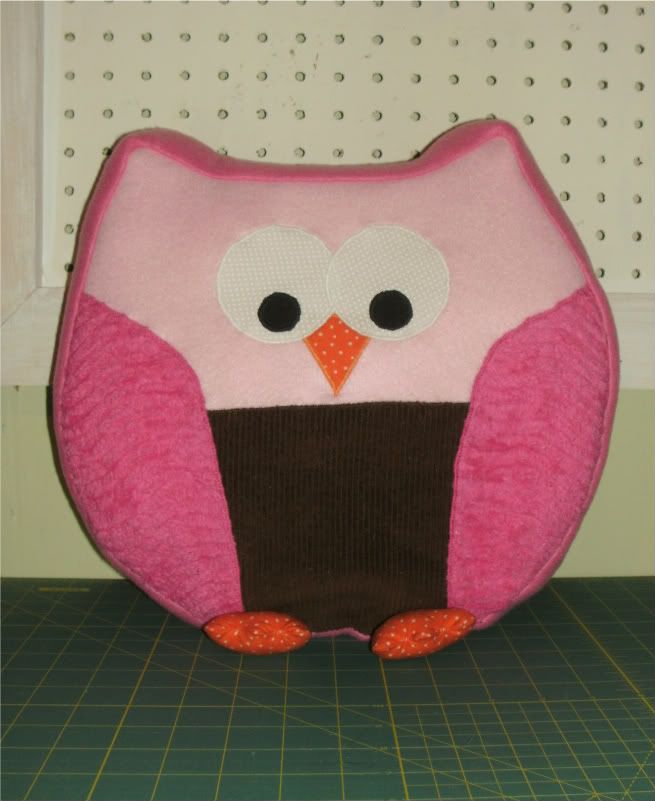
I have a 4 year old that loves Owls. She calls them "Hootie Owls". I found a GREAT tutorial on Make It and Love It for the cutest Owl Pillow! This is a great project and can be done with many different fabrics. I chose fleece, cotton, corduroy and chenille for my Owl pillow.  The tutorial is so easy to follow! I've had more fun making things for my girls for Christmas this year than ever! Here is my end result.

 I added a pocket to the back of my Owl. My little girl will be so happy to get her pillow on Christmas morning.
 Here is the link to the Tutorial.
http://www.makeit-loveit.com/2010/12/snuggly-owl-for-sewing-republic.html

Tuesday, December 20, 2011

Two Cute Little Christmas Dresses

The crafting continues {at a faster pace now} until Christmas! I only have 3 more days left to complete all of my projects. I am making each of my 3 girls a cute little Christmas Dress. I have 2 finished.
This one is a knot dress for my little Mackenzie made with Michael Miller fabric.
The other one Grinch fabric by Robert Kaufman. See the "Merry Grinchmas"? How cute is that! This one is for my little Kaylee.

I still have one more to make for my oldest daughter, Paige.I love these sewing patterns and use them a lot! The knot dress pattern came from Little Lizard King. I don't follow the instructions exactly the way they explain but the measurements are nice. The peasant dress pattern is "The Charlotte Dress" pattern by Mama Stellato. Both pattern makers are on Etsy. I, of course, changed them. That's what I do. Find something I love and add my own little twist to"make it my own".


Tuesday, December 13, 2011

A Doll Diaper Bag

I found a great tutorial for the cutest doll diaper bag on Twelve Crafts till Christmas! The tutorial was so easy to follow and has a lot of great photos showing step by step instructions. I had so much fun creating this adorable little diaper bag for my 4 year old. The size of this bag is perfect! It doesn't have to be a diaper bag. You can also make a pretend play mail carrier bag (that is my next project) or it could even be a ladies purse. No one would even know! Here is the link to the tutorial. http://twelvecraftstillchristmas.blogspot.com/2010/09/pretend-and-play-diaper-bag-tutorial.html. This is my end result!
                                              I added a patch on the front instead of a pocket.
Here is the back. I added a double pocket on the back. I just sewed a line right down the center separating the pockets into two.I also added a pocket on the inside.
This was/is a great project and a very special gift for any child! I will be making more of these! Now I just have to make some cute little diapers to go with it!  Happy Crafting!

Wednesday, December 7, 2011

A Doll Sized Rag Quilt {made with scraps & lots of love}

 I've always wanted to make a rag quilt. I found a video (http://www.youtube.com/watch?v=l-LQfYXrG_Q) on YouTube a while back that has perfect instructions! I decided to make a doll sized rag quilt to start since I am on a doll accessory making kick anyway. This will be a Christmas gift for one of my 4 year olds. I just pulled some flannel scraps from my shelf and went work. I LOVE how it turned out!
My doll sized quilt is 18"x18". I cut 18 squares 7"x7". You will need two squares per block. This was so easy to make and so much fun! I used flannel but you can also use cotton. After Christmas I'm going to make 3 twin sized rag quilts. I will use batting for those. Here is a great tutorial that explains how to use batting in your rag quilt. http://teachinggoodthings.com/blog/make-it-give-it-or-sell-it-rag-quilts/comment-page-1/ 
Here is a close up of the quilt.
This cost me nothing but a little time and some fabric scraps. My daughter will love it. What are you making for your little ones for Christmas?